Showing posts with label DIY. Show all posts

Thursday, February 23, 2012

DIY: Washer & Ribbon Necklace


I've been seeing this necklace on Pinterest a lot lately and it sparked my interest. It only takes two supplies to make; metal washers and grosgrain ribbon, both of which I had already, so I decided to give it a whirl. I wore it yesterday and really loved it! Here's a quick tutorial:


You will need:
20 - 30 1" metal washers (I used 24. Use more or less to make it the length you want.)
5/8" wide grosgrain ribbon, about 1 yard (or more, depending on your desired length of your necklace)

Step 1:
Thread your ribbon up through washer #1, leaving enough ribbon on the end to tie the necklace when it's finished.

Step 2:
Thread the ribbon down through the top of washer #2.

Step 3:
Thread the ribbon back down through washer #1.

Step 4:
Pull the ribbon tight, so washer #2 is laying flat on top of washer #1.

Step 5:
Thread the ribbon back up through washer #2.

Step 6: 
Repeat steps 2 through 5 for each additional washer. Once you've threaded all your washers onto the ribbon, tie the two ends of the ribbon together and trim off the excess. Finished! Easy, right?

Don't forget to check out my handmade jewelry shop on Etsy, Nestled! Here's a peek at my collection:

Friday, February 17, 2012

DIY: Beaded Bib Necklace


I recently came across a tutorial for making this necklace on Pinterest and wanted to give it a try. I've never made any kind of jewelry before, but the instructions were fairly simple and easy to follow. The necklace turned out pretty good, so I thought I would share it on here so you can make your own. 

Here's what you will need:
Round beads (if I counted right, I used 118 beads)
Nylon-coated beading wire
Metal crimps
Needle-nose pliers
Ribbon

Step 1: Make Center Piece
Cut an 18-inch length of nylon-coated beading wire. String 12 beads onto the middle of wire, and thread opposite end through last bead to make the bottom circle. For middle circle, string 5 beads onto each end. Add 1 more, and thread opposite end through it. For top circle, string 5 beads onto each end. Add 1 more bead and a metal crimp, and thread opposite end through each. Close crimp with needle-nose pliers; trim ends.


Step 2: Make Right and Left Pieces
 Cut a 55-inch length of wire. String 7 beads onto the middle of wire, then loop in far-right bead of center piece's middle circle. Add 3 more beads to left end, and thread opposite end through last bead to make bottom circle. For second circle, add 5 beads to right end. Add 2 beads to left end, then loop in far-right bead of top-center circle. Add 3 more beads to left end, and thread opposite end through last bead. For third circle, thread 5 beads onto each end. Add 1 more, and thread opposite end through it. Repeat to add more circles to reach nape of neck, and close final circle with a crimp. To make the left piece, follow steps above.


Once you have all the beading completed, simply tie on some ribbon and you're finished! Obviously you don't have to use yellow beads like I did; you can use any color(s) that tickle your fancy.


This project has really wet my appetite for jewelry-making. It's fun and easy, and the possibilities are virtually endless. Be on the look-out for more in the future!

Monday, February 13, 2012

DIY: Oversized Chalkboard


This chalkboard is something I've been wanting to make for a while now, and after seeing this picture on Pinterest, it gave me the motivation I needed to get it done. It was very easy and I love it! Here's how I did it:


I started with a 2' by 4' piece of prefinished plywood. My dad, who builds cabinetry for a living, let me have this piece from his shop and cut it to size for me. If you don't have a handyman in the family like I do, you can have this done at Home Depot or Lowe's.


After sanding my piece of wood, I rolled on three coats of Rust-Oleum's chalkboard paint. I let it dry four hours between coats, and gave the paint three days to cure before writing on the surface.


During those three days (which seemed to drag on forever) Jesse added a wood frame to my chalkboard. He found some scrap wood from my dad's shop that was already stained, cut four thin pieces, and attached them directly to the sides of the plywood with some wood glue and a micro pinner gun. I then added a couple heavy duty picture hangers to the back. I found them at JoAnn Fabrics and they look something like this:


Finally, the chalkboard was ready to use!


First, I had to "season" the chalkboard by rubbing the side of a piece of chalk all over the surface and erasing it. This layer of chalk dust makes writing and erasing a little smoother.

And... done!!


Thursday, February 2, 2012

House Numbers

On Tuesday, I shared a little preview of a DIY project I was working on. Well, here it is... painted house numbers!


I got the idea from Pinterest. I was planning on doing this in the spring, but when I heard we were having a 60 degree day in January, I quickly jumped on the opportunity. Here's how I did it:


On regular paper, I drew an outline of my letters and numbers and carefully cut them out with scissors. I didn't want to just start painting without any pattern, because if I made a mistake it would be a little difficult to fix. Once I had everything cut out, I arranged them where I wanted and taped them on the door.


I roughly traced everything with a pencil. Once that was done, it was time to paint! This took a very steady hand, which I totally didn't have. That extra cup of coffee I drank that morning really wasn't doing me any favors.


The paint I used is Olde Century acrylic paint in Manor House White. It's indoor/outdoor paint and a small bottle like this was only about 5 bucks. The brush I used was just a small arts and crafts paint brush.


This is what it looked like after one coat of paint. It needed one more, so I let it dry for about an hour before giving it another coat.


It was super easy, very inexpensive, and I love the results! It gives our otherwise plain-jane house a little personality. Now maybe I should start thinking about giving those stairs some fresh paint too...

Tuesday, January 31, 2012

I'm DIY-ing... wait, that doesn't sound right...


Here is a little preview of a small DIY project I'm doing today. Can you guess what it is? Here's a couple hints:
#1: Today's temperature is expected to hit 60 degrees.
#2: That is a little bottle of exterior paint.
Come back on Thursday (assuming it works as I'm hoping) to see the results!

Monday, February 21, 2011

Shedding New Light

Remember when I said my super sweet hubby bought me an awesome Valentine's Day gift for the dining room? Well, it's all finished and ready to be revealed! But first, a little background information.

Ever since we moved to the new rental house a couple months ago, I've wanted to get a different light fixture for the dining area. This is what was there when we moved in:


A contemporary-style silver chandelier with alabaster glass shades. Or in other words, "ick." (You can see another picture of it here - second to last picture.) So I started paging through a stack of old Pottery Barn catalogs to get some inspiration and found this beauty:


Gorgeous! But expensive. So the search continued for something similar... then I saw this post from The Lettered Cottage and loved the Pottery Barn knock-off chandelier she created for only 75 bucks:


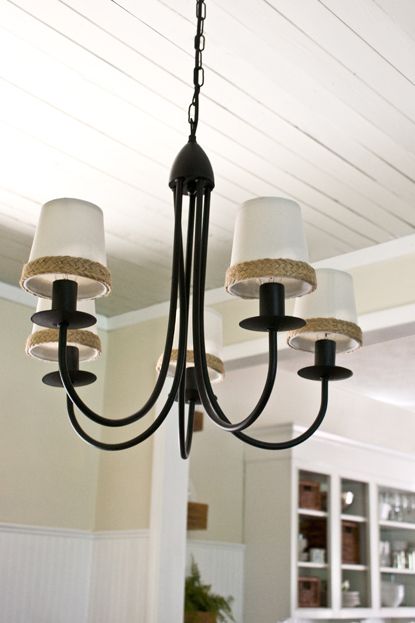
And so, this is where my hubby comes in... for Valentine's Day, he bought me the supplies I needed to make my own Pottery Barn knock-off chandelier! Woo-hoo! He sure knows the way to my heart. :) Here's the final results:


So much better than "ick." I love it! The chandelier and shades came from Lowe's, and the jute trim came from M & J Trimming. I attached the trim with a few dabs of hot glue, and ta-da! A stylish chandelier for about a quarter of the price... in yo' face, Pottery Barn!

I also made a make-shift cord cover with a bit of burlap I already had. Wrap it around the cord, and hot glue the ends.


Hot glue is my new best friend.